So today begins the kids' school break...oh heavens...we're in for it. The countdown to Christmas is now T-3 days...really 2 and a half as the kids stated.
The neighbors gifts...FINISHED! Thank the good lord! The Christmas cards have begun being delivered by our neighborhood friendly mailman & I'm finishing up the greatest little gifts ever! Believe it or not I feel completely prepared for the Christmas whirlwind to begin.
I keep telling myself..."Kristin, don't worry...relax, breathe...you can get all this done...everyone will love everything and soon very soon you'll be able to take a break!" All I can say is my poor house. The hubs says he can't wait until I can clean up my craft stuff. It's looking like my craft closet puked all over the dining room. I must agree...but I have to say it's at least contained. So between 3 crazy boys, 1 sweet little girl & a ton of crafts I'm thinking I need a mansion to keep everything organized!
I've been really enjoying my creative processes this Christmas. Tons of projects started and here I am hoping I can get them all done. Obviously some aren't for Christmas. Like Hadleigh's crib bumper & blanket. The boys' quilts...those will just have to wait! Soon very soon...
I really hope you all are having a very relaxing and super merry holiday & hopefully I'll be able to get some more work done to this silly blog soon....make it "Me"! I'm working on it....however I suppose the holiday season wasn't the best time to start? hahaha
Merry Christmas!!!
Kristin

12.22.2010
12.20.2010
It's Almost Christmas!!!
So it's almost Christmas and the kids are almost out for their break...it's at this time I say "Let's say thank you to your teachers and give them a little Christmas gift to show our appreciation for being 2 of the most amazing teachers ever!!" This evening...I took the time to make these amazing women a little homemade gift saying thanks...
My idea...one I've used many times...Gingerbread Cookies...IN A JAR!!
Oh yes many people do these...however they're such an awesome gift and really thoughtful...so pretty to see and exceptionally easy to make!
What You'll Need:
A quart sized ball jar
A piece of red card stock
Ribbon
A square of fabric large enough to cover the lid completely
Ingredients:
Layer 1:
2 cups all-purpose flour
1 teaspoon baking powder
1 teaspoon baking soda
Layer 2:
1 cup hard-packed brown sugar
Layer 3:
1.5 cups all-purpose flour
2 teaspoons ground ginger
1 teaspoon ground cloves
1 teaspoon ground cinnamon
1 teaspoon ground allspice
Directions:
Mix Layer 1 ingredients. Funnel them into the jar and tap the jar on the counter to pack in the flour.
Add Layer 2 to jar. Repack the brown sugar into the jar. I used a bottle to press it down (mainly because I had a bottle. Whatever you have use because this needs to be a really tight layer!)
Mix Layer 3 ingredients. Funnel them into the jar while tapping jar on the counter. This is going to be completely fully and take a few seconds to do!
Put on lid. Now it's time to move to the computer. Or you can print this by hand.
You're going to want to print this or write this onto a card. You don't want the card to be too big, but however big you want. I happen to like a cute font...hence...the computer.
Gingerbread Cookies
You’ll Need:
½ cup softened butter or margarine
¾ cup molasses
1 slightly beaten egg
1. Empty contents of this jar into a large mixing bowl. Stir to blend together.
2. Mix in all of the above ingredients. Dough may be stiff so you may have to use your hands. Cover, and refrigerate for 1 hour.
3. Preheat oven to 350 degrees F.
4. Roll dough to ¼ inch thick on a lightly floured surface. Cut into shapes with a cookie cutter. Place cookies on a lightly greased cookie sheet about 2 inches apart.
5. Bake for 10- 12 minutes. Decorate as desired.
6. ENJOY!!
Now print and trim to your specifications. Cut the red card stock a bit bigger. Put a hole punch in the corner. Place the fabric over the lid and attach the recipe card to the ribbon & tie the ribbon around the lid & fabric.

Voila and you're done! These are the cutest gifts and so easy to do!!
12.16.2010
Etch-A-Sketch (the adult version)
So Jackie (my seester in law) tells me she's got an idea. I put on my seatbelt...haha actually I walked around the corner to her house and checked out her awesomeness....She shows me this picture of a pyrex baking dish with the glass etched with a name. She goes "Kristin, there's this stuff at Joann's that you put on glass and it etches it." I say "Let's go get some..." And the ideas in my mind are endless...
My idea is...hey ,my sister in law ,who just got married. could use an awesome homemade Christmas gift...so I get a tall vase (courtesy of Jackie's wedding & an abundance of tall vases) and an idea. I'm gonna give you a run down on how to do it...because the outcome is amazing and it's really simple to do.
Items that you'll need: (at least I did!)

That includes:
Armour Etch (I got it at Michael's)
Contact paper
A Stencil
Pencil (I used a photo pencil)
Pen knife
Paint brush (nylon is best)
A Vase
Ribbon
Ok now what you're gonna do is take your stencil (I used their monogram for the vase). I arranged it in Photoshop CS5 which made placement super easy and exactly how I wanted without having to free hand it. After you have what you want...print it out.
Place your stencil underneath the contact paper and trace it on...
Now make sure your vase is clean. Don't use window cleaner on it because there are repellents in the cleaner that will keep the armour etch from working properly.
Take the backing off of the contact paper and place it on the vase the way you want it. You're gonna want a bigger piece to cover the vase...the armour etch can run and you don't want it etching things you want to stay clear...
What you're gonna do now is the hardest part...take the pen knife and cut out the stencil. This is really hard. Especially if there are lots of curves...I had an awesome time with it...please catch the sarcasm...finally I sat down and said I'm gonna do this and you're gonna work. After we had that talk...it worked beautifully...you might wanna lead with that! :)
Now this part is optional...I used a hair dryer to warm the contact paper...then made sure all the bubbles were out and the contact paper was snug against the vase so the armour etch wouldn't get underneath it. Let it cool off.
Now take your armour etch and your paint brush and brush on a THICK layer of the goop. Make sure everything is covered completely. It says leave it on for 10 minutes...I say minimum 30 minutes...I like the result of 30 minutes...I left mine on for an hour. It's a good look.
Once the time is up...I scrape the excess off and put it back in my jar. Take the vase and rinse with water. Then take some windex and clean it up really good. Dry.
Now all you have left to do is tie your bow or decorate it any other way you'd like!
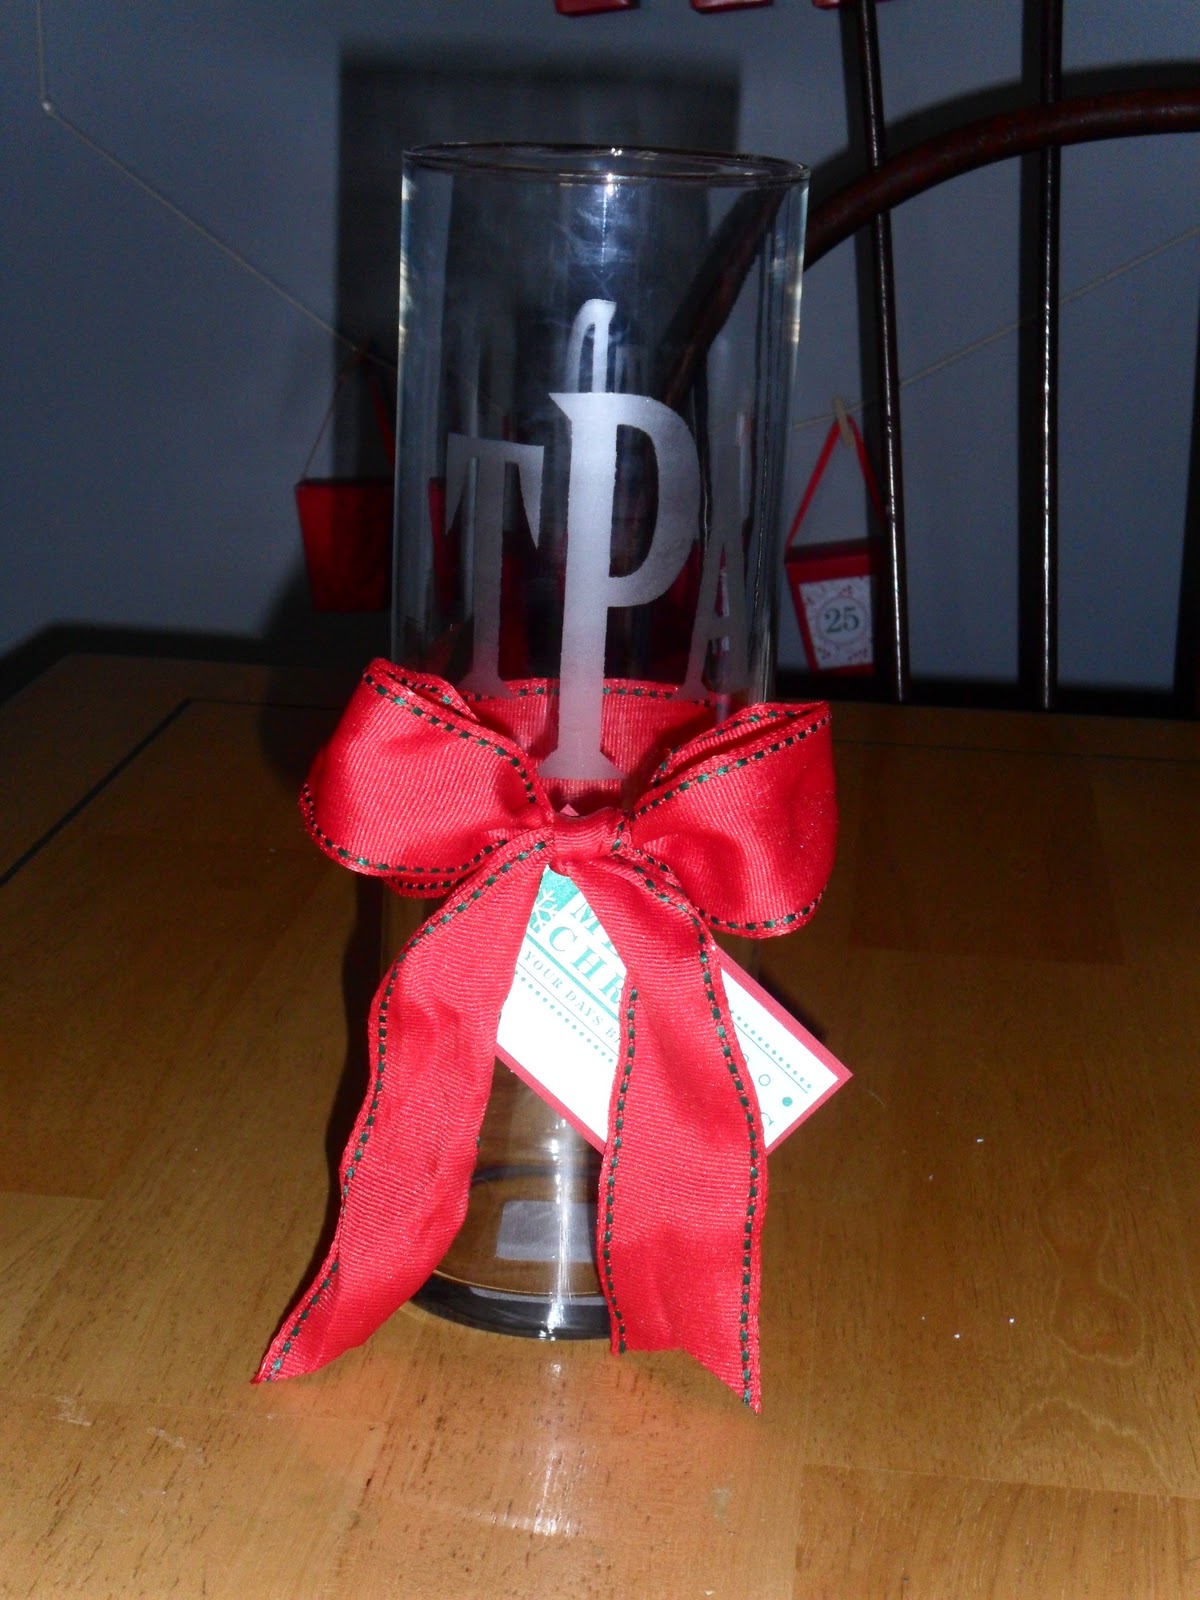

My finished project. After everything was cleaned up I added a dark green candle and the little Merry Xmas card!
12.13.2010
11 days until Christmas!
This year has just flown by...I don't think I'd have made it through this year without my seatbelt...but in looking back it has been the greatest year ever! I've been completely and utterly blessed. Life is beautiful!!
As far as crafts have been going...I think I've been in the middle of 9382479237592384 different projects. My sister in law's gift have taken front runner though since they've gotta be shipped to Hawaii...yes I'm running behind, but they are being shipped on Wednesday morning at the latest. My Christmas cards are going out then as well...I'm so excited...
Tomorrow I'll be starting Hadleigh's crib bumper...she's starting to scoot herself around in bed so I figure it's time. I thought if I made one it'd be way cuter than buying one...so here's to being adventurous. I'm also making a blanket which I'm TOTALLY psyched about. I'm going to put up pictures as I go and if all goes as planned a tutorial.
I feel miserably about not having any up so far. Even though it's not an excuse I've been ridiculously busy. Go figure having 4 kids and a hubby...and trying to squeeze out a life ha!
Subscribe to:
Posts (Atom)